SageMaker : Building Your Own Image Generation Model (with FineTuning)
- Nov 13, 2024
- 7 min read
SageMaker : Building Your Own Image Generation Model (with Fine-Tuning)

Written by Hyeonmin Kim
Generative AI models are broadly divided into two categories: image generation models and text generation models. Each generative model processes various types of input but produces output in two main formats: images and text.
Today, these models are commonly used to create chatbots or generate image assets for various applications.

Today, based on the architecture above, we will:
Deploy an image generation model easily using SageMaker
Train custom images through SageMaker Training Job
Use the fine-tuned image generation model to create images based on our custom dataset
SageMaker introduced the JumpStart feature in December 2020. Since then, the model collection has steadily grown, and in November 2022, it became possible to easily deploy Stable Diffusion models. We will use this JumpStart feature to leverage Stable Diffusion, a text-to-image model, to train our custom images through the learning process.
Environment Setup
To follow this post, you'll need a SageMaker Studio environment. (Reference: SmileShark Blog - Getting Started with GenAI Fine-tuning on AWS)
First, access SageMaker Studio and create a Jupyter notebook (.ipynb) environment before proceeding.


If you see a Jupyter environment like this, you're ready to go.

SageMaker Environment Configuration

Before starting this work, let's check the session to grant permissions to access related AWS resources.
import botocore
import sagemaker, boto3, json
from sagemaker import get_execution_role
import os

iam = boto3.client("iam")
aws_role = iam.get_role(RoleName="hmkim-sagemaker-full")["Role"]["Arn"]

boto_session = boto3.Session()
aws_region = boto_session.region_name
sess = sagemaker.Session(boto_session=boto_session)

print(aws_role)
print(aws_region)
print(sess.boto_region_name)
If the IAM role and two region names match as shown, you've succeeded.
Now let's create a directory for training images and add the images to be trained.
The following code creates a folder called training_images, where you need to add the images for training. In this post, we'll train our family dog.
local_training_dataset_folder = "training_images"
if not os.path.exists(local_training_dataset_folder):
    os.mkdir(local_training_dataset_folder)
Adding Training Image Dataset

Check the left menu bar to confirm the training_images folder has been created, then add images.

You can use the sample images below, but we'll add images of our family dog.


By the way, our dog's name is Echo and the breed is Poodle. Here are the images used for training:


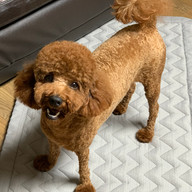


You can easily add images by drag and drop.

Now that we've added the image dataset to be trained, we need to tell the system what these images represent. We'll add information about "what they represent" in a dataset_info.json file.
Use the following code to create it. I wrote a prompt describing it as a photo of a dog named Echo.
instance_prompt = "A photo of a dog named echo"

import os
import json

with open(os.path.join(local_training_dataset_folder, "dataset_info.json"), "w") as f:
    f.write(json.dumps({"instance_prompt": instance_prompt}))
The dataset_info.json file is created with the following content.

Configuring Training/Output S3 Buckets

Now, let's specify the S3 bucket where SageMaker models and training data will be stored. We can use AWS-provided utils.py to automatically create it if it doesn't exist.
mySession = boto3.session.Session()
AwsRegion = mySession.region_name
account_id = boto3.client("sts").get_caller_identity().get("Account")

training_bucket = f"stable-diffusion-jumpstart-{AwsRegion}-{account_id}"

s3 = boto3.client("s3")
s3.download_file(
    f"jumpstart-cache-prod-{AwsRegion}",
    "ai_services_assets/custom_labels/cl_jumpstart_ic_notebook_utils.py",
    "utils.py",
)


from utils import create_bucket_if_not_exists

create_bucket_if_not_exists(training_bucket)
Specify the S3 path for training. Then copy (upload) the training image set previously saved as training_images to S3.
train_s3_path = f"s3://{training_bucket}/custom_dog_stable_diffusion_dataset/"

!aws s3 cp --recursive $local_training_dataset_folder $train_s3_path
Checking the actual bucket, you can confirm the images have been uploaded.

Specify the S3 location where results will be output.
output_bucket = sess.default_bucket()
output_prefix = "jumpstart-example-sd-training"

s3_output_location = f"s3://{output_bucket}/{output_prefix}/output"
SageMaker Training Setup

Now let's fine-tune the stable diffusion model with these images.
As mentioned earlier, stable diffusion was added as a jumpstart model, making it easy to specify the base model for training. We'll use the model-txt2img-stabilityai-stable-diffusion-v2-1-base model.
from sagemaker import image_uris, model_uris, script_uris

train_model_id, train_model_version, train_scope = (
    "model-txt2img-stabilityai-stable-diffusion-v2-1-base",
    "*",
    "training",
)

training_instance_type = "ml.g4dn.2xlarge"

train_image_uri = image_uris.retrieve(
    region=None,
    framework=None,
    model_id=train_model_id,
    model_version=train_model_version,
    image_scope=train_scope,
    instance_type=training_instance_type,
)

train_source_uri = script_uris.retrieve(
    model_id=train_model_id, model_version=train_model_version, script_scope=train_scope
)
train_model_uri = model_uris.retrieve(
    model_id=train_model_id, model_version=train_model_version, model_scope=train_scope
)
The SageMaker SDK automatically retrieves the environment, source, and models needed for training. This is one of SageMaker's major advantages.

Define hyperparameters for tuning. The SageMaker SDK provides default hyperparameters suitable for the model, so you only need to modify the parts you want to change. I'll adjust only the max_step.
from sagemaker import hyperparameters

hyperparameters = hyperparameters.retrieve_default(
model_id=train_model_id, model_version=train_model_version
)

hyperparameters["max_steps"] = "200"
print(hyperparameters)
Fine-tuning with SageMaker Training Job

Let's proceed with fine-tuning using SageMaker SDK (Training).
Running the following code creates an estimator including the image set and resources defined to be provided to the model, then proceeds with fitting by referencing S3. This process takes about 10 minutes.
%time
from sagemaker.estimator import Estimator
from sagemaker.utils import name_from_base
from sagemaker.tuner import HyperparameterTuner

training_job_name = name_from_base(f"jumpstart-example-{train_model_id}-transfer-learning")

sd_estimator = Estimator(
    role=aws_role,
    image_uri=train_image_uri,
    source_dir=train_source_uri,
    model_uri=train_model_uri,
    entry_point="transfer_learning.py",
    instance_count=1,
    instance_type=training_instance_type,
    max_run=360000,
    hyperparameters=hyperparameters,
    output_path=s3_output_location,
    base_job_name=training_job_name,
)

sd_estimator.fit({"training": train_s3_path}, logs=True)
Checking training in the SageMaker console, you can confirm the training job is running.

When the training job runs, it automatically configures an ML environment as a container, goes through training, and finally outputs a custom-trained model.

You can see the trained model is located in the previously specified output bucket.

Deploying the Fine-tuned Model

Now let's deploy this fine-tuned model to a SageMaker Endpoint.
Deploy using the same SageMaker deployment method, but specify the model information as trained model information.
%time

inference_instance_type = "ml.g4dn.2xlarge"

deploy_image_uri = image_uris.retrieve(
    region=None,
    framework=None,
    image_scope="inference",
    model_id=train_model_id,
    model_version=train_model_version,
    instance_type=inference_instance_type,
)
deploy_source_uri = script_uris.retrieve(
    model_id=train_model_id, model_version=train_model_version, script_scope="inference"
)

endpoint_name = name_from_base(f"jumpstart-example-FT-{train_model_id}-")

finetuned_predictor = sd_estimator.deploy(
    initial_instance_count=1,
    instance_type=inference_instance_type,
    entry_point="inference.py",
    image_uri=deploy_image_uri,
    source_dir=deploy_source_uri,
    endpoint_name=endpoint_name,
)
Testing the Fine-tuned Model
Let's declare functions for the inference process to test the model.
import matplotlib.pyplot as plt
import numpy as np


def query(model_predictor, text):
    """Query the model predictor."""

    encoded_text = json.dumps(text).encode("utf-8")

    query_response = model_predictor.predict(
        encoded_text,
        {
            "ContentType": "application/x-text",
            "Accept": "application/json",
        },
    )
    return query_response


def parse_response(query_response):
    """Parse response and return generated image and the prompt"""

    response_dict = json.loads(query_response)
    return response_dict["generated_image"], response_dict["prompt"]


def display_img_and_prompt(img, prmpt):
    """Display hallucinated image."""
    plt.figure(figsize=(12, 12))
    plt.imshow(np.array(img))
    plt.axis("off")
    plt.title(prmpt)
    plt.show()
Now let's create a prompt and output an image. I asked for an image of Echo with a happy smile. (A photo of a dog named echo with happy smile)
all_prompts = [
    "A photo of a dog named echo with happy smile",
]
for prompt in all_prompts:
    query_response = query(finetuned_predictor, prompt)
    img, _ = parse_response(query_response)
    display_img_and_prompt(img, prompt)
AI Echo is complete! But something seems strange. The clothes are only on the front legs. Let me generate another one.
all_prompts = [
    "A photo of a dog named echo that eating snacks",
]
for prompt in all_prompts:
    query_response = query(finetuned_predictor, prompt)
    img, _ = parse_response(query_response)
    display_img_and_prompt(img, prompt)
It generates normally, but we need to add negative words to remove the clothes or other unnecessary content for practical use. The clothes are probably appearing because we used images of Echo wearing clothes during training.
Let's define and use a query function for more precise prompt adjustment.
from PIL import Image
from io import BytesIO
import base64
import json

def query_endpoint_with_json_payload(model_predictor, payload, content_type, accept):
    """Query the model predictor with json payload."""

    encoded_payload = json.dumps(payload).encode("utf-8")

    query_response = model_predictor.predict(
        encoded_payload,
        {
            "ContentType": content_type,
            "Accept": accept,
        },
    )
    return query_response


def parse_response_multiple_images(query_response):
    """Parse response and return generated image and the prompt"""

    response_dict = json.loads(query_response)
    return response_dict["generated_images"], response_dict["prompt"]

def display_encoded_images(generated_images, title):
    """Decode the images and convert to RGB format and display

    Args:
    generated_images: are a list of jpeg images as bytes with b64 encoding.
    """

    for generated_image in generated_images:
        generated_image_decoded = BytesIO(base64.b64decode(generated_image.encode()))
        generated_image_rgb = Image.open(generated_image_decoded).convert("RGB")
        display_img_and_prompt(generated_image_rgb, title)


def compressed_output_query_and_display(payload, title):
    query_response = query_endpoint_with_json_payload(
        finetuned_predictor, payload, "application/json", "application/json;jpeg"
    )
    generated_images, prompt = parse_response_multiple_images(query_response)

    display_encoded_images(generated_images, title)
Now, let's specify clothes (cloth) as a negative prompt when generating images.
prompt = "A photo of a dog named echo with happy smile."
negative_prompt = "cloth"
payload = {"prompt": prompt, "negative_prompt": negative_prompt, "seed": 1}
compressed_output_query_and_display(
    payload, f"generated image with negative prompt: `{negative_prompt}`"
)
Now it looks a bit more like our Echo! This time, I requested an image of Echo running on the beach.
prompt = "A photo of a dog named echo / the dog is running on the beach side"
negative_prompt = "cloth"
payload = {"prompt": prompt, "negative_prompt": negative_prompt}
compressed_output_query_and_display(
    payload, f"generated image with negative prompt: `{negative_prompt}`"
)
It generates well as expected.
Looking at both outputs, you can confirm that each output is similar to the previously trained images.


The more training images we have, the more accurate the images will probably be.
Today, we used SageMaker to fine-tune Stable Diffusion, one of the Jumpstart FM models, with custom images and SageMaker Training Job to create and deploy a model that can generate our own images. The range of applications seems limitless, from generating company image assets to creating virtual characters. This concludes our post.